- UID
- 468
- UCC
-
- 声望
-
- 好评
-
- 贡献
-
- 最后登录
- 1970-1-1
|
Known Details
----------------------------------------------------------------------
All axis identifications are based on 3DS Max or GMax. These are: X - Left/Right , Y - Forward/Back , Z - Up/Down
For simplicity, Forward/Rear/Left/Right turrets will be called Horizontal Turrets, and the Up/Down types Vertical Turrets.
Creating horizontal turrets is fairly straight forward. Once you understand the basics, all that’s needed is the creativity to making the parts that will go into the creation.
However, making vertical turrets that are meant for the Tops and Bottoms of ships requires a bit of rethinking, and redesign.
The reason this needs to be understood, is because many don’t realize the limitations X3 puts on how turrets behave, based on how they are created.
For Example:
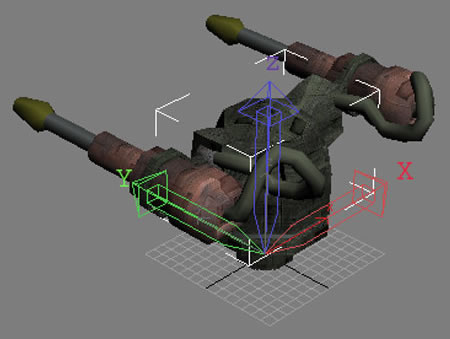
Every horizontal turret is created with its base on the XY plane (the grid under the gun). For articulated turrets (those with multiple moving parts), the base (or socket) is usually centered on XYZ coordinates [0,0,0]. This means the bottom of the base is centered at 0 altitude (Z) and centered left-right (X) and forward-back (Y) on the grid.
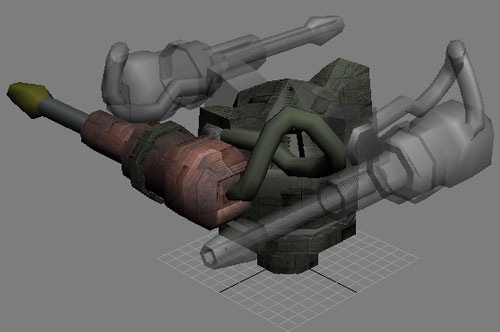
Articulated turrets, are those designed to move when used. In the case of multipart turrets, more than 1 part can move about, based on its pivot definition. Pivots can be defined anywhere, but are usually meant to make the movement aesthetic to the whole.
Normal turret movement:
Base (Socket) - Usually no movement
Body - Rotation along the Z axis
Guns – Rotation along the X axis, based on their pivot location, and rotation on the Z axis, usually to follow the body
X3 understands this, but applies certain rules to Horizontal Turrets (see above):
Limitation of 90° Z rotation (body, guns) based on the Y axis (Facing) direction:
Limitation of 90° X rotation (guns only) based on Y axis direction:

These limitations are fine for turrets assigned to any of the planar orientations of the ship (left, right, forward, rear). But, it puts a serious crimp on any vertical orientation assigned turrets.
I discovered a way to beat these limitations, that X3 agrees with. Thus allowing the construction of turrets that can cover the entire 360° Z axis field, which an Up/Down turret is sorely needed to be doing.
My first attempts at this created a nasty little object, which, though it worked, behaved rather oddly based on how I perceived a turret to needed to behave. I have since found the error, and corrected it.
Construction
----------------------------------------------------------------------
I discovered, that by altering the orientation of the turrets construction slightly, I was able to make X3 utilize it in the manner that an Up/Down turret is supposed to work in. The first task is to change the plane on which the turret is created. Instead of using the XY plane, we use the XZ plane:
This is achieved by rotating the base (socket) and body -90° on the X axis. Only these 2 parts need rotating. The guns, just need to be realigned with the pivot point position they had relative to the body.
You then need to align all the parts Pivot Points for this new orientation. In this instance, the socket, and body, would have their pivots set to [0,0,0] (no change really), and the guns would have their X and Y pivot points exchanged.
Note: Do not rotate the pivot points themselves. This is unnecessary, and may cause you some amusing results.
On each part, use the Reset XForm utility (Reset Selected), and the Collapse Utility (Collapse Selected). This will lock this orientation of the parts and their pivot points.
Rename the parts. The original model I used was bfg2_xxxxx. So, I saved each part under bfg3_ (i.e. bfg3_socket). Before saving the guns, I suggest you create the laser part, position and link it to the guns, and create entry in the Components file with DBOX.
Create the bfg3_scene file for this model (sans the laser entries). Next, create the dummy entry (see How to create weapon dummies).
Now for the important part:
Open the Dummies file. Find the SDTYPE_GUN area. Increment the number by 1. Now, find the gun you used as a template (in this case ships\props\bfg2_dummy). Copy this line, and paste it below it. Change the bfg2 to bfg3 (or whatever the new gun name you chose).
Next, find all the entries that say GUNPARTF_ROTATEALPHA. Change this to GUNPARTF_ROTATEGAMMA. There will be 3 entries of this (usually). One for the body (only flag) and one for each gun (usually 2 flags, GUNPARTF_ROTATEBETA is for up/down rotation). Save the file.
Next, verify the Components.txt file has the entries for you new gun. Verify the path, or you’ll have guns that can track, but not shoot.
Lastly, put the gun .bod files, the Dummies.txt and Components.txt files into a mod (false patch or real mod, doesn’t matter).
All you have to do next is edit a ship scene file to use these guns. Make sure you set their rotation correctly, so their facing the right direction.
For example:
//Up (Top) turret
P 73; B ships\props\bfg3_dummy; C 6; N Bships\props\bfg3_dummy_6b; b
{ 0x2002; -52000; -50000; -27000; 0.250000; -1.000000; 0.000000; 0.000000; -1; -1; } // -1
//Down (Bottom) turret
P 73; B ships\props\bfg3_dummy; C 6; N Bships\props\bfg3_dummy_6b; b
{ 0x2002; -52000; -50000; -27000; 0.250000; 1.000000; 0.000000; 0.000000; -1; -1; } // -1
You can also use 3ds/Gmax to create the scene for you. Just import the turret dummy, and rotate -90° for Down guns, and 90° for Up guns.
This procedure allows the turret to have a full 360° rotation on the Z axis. The guns, however, will have 180° X axis rotation (horizon to horizon).
This procedure can also be applied to single part turrets, for use on Top/Bottom mounts (see DDRS Millennium Falcon as an example of a ship that need this). Just remember to change the rotation flags in Dummies.txt from alpha to gamma. |
|
 /1
/1 


 狗仔卡
狗仔卡 发表于 2009-9-30 19:14:39
 提升卡
提升卡 置顶卡
置顶卡 沉默卡
沉默卡 喧嚣卡
喧嚣卡 变色卡
变色卡 抢沙发
抢沙发 千斤顶
千斤顶 显身卡
显身卡